the bettytv remote is an arm based remote control with lots of extras. the remote talks to a device parsing video text signals from your tv (scart connector) and a device using the telephone line as a feedback channel (modem) over a wireless connection.
you are stupid if you use these parts as intended. you have a nice hardware to play with for peanuts on the other hand.
the goal is to develop an alternative firmware for the tv remote and to exploit some parts of the additional hardware for other projects.
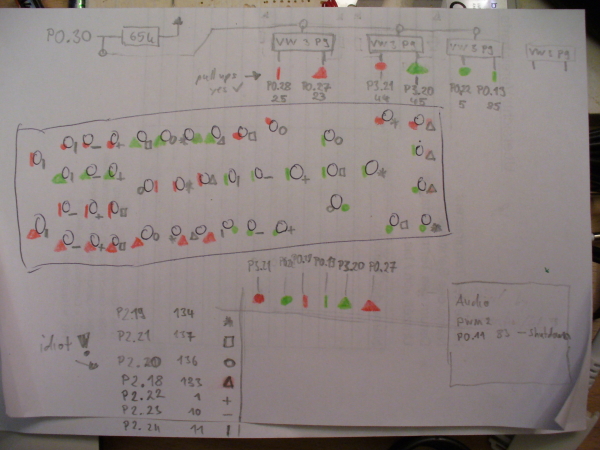
there are some pics to identify the
http://hackdaworld.org/pics/betty/
lpc2220 - 32 bit arm7tdmi-s cpu
en29lv800 - flash memory (2x)
cc1100 - rf transceiver
ssd1854 - lcd display driver
flash:
boot:
rf:
display:
buttons:
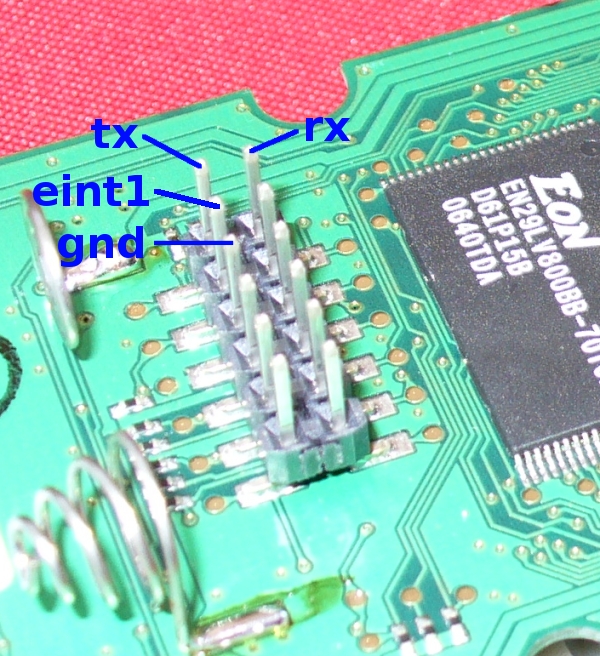
12pin header:
verbose betty:
by simply connecting tx, rx and gnd of the 12 pin header to a max232 (externally powered) and by supplying the betty with power (batteries) you can watch the betty boot at 115200 baud (8n1). there is a log without the scart and modem connector on power:
http://hackdaworld.org/download/betty_boot.txt
entering the bootloader:
this is simple. shortcut gnd and eint1 and power on the betty. you can now synchronize with the bootloader according to page 256 of the lpc user manual. you can no longer use 115200 baud!
the central tool to use is the lpcload tool.
you can find the lpcload and fwflash tools here: http://www.hackdaworld.org/cgi-bin/gitweb.cgi?p=my-code/arm.git;a=tree;f=betty
the lpcload tool loads/executes the fwflash.hex file into/from the ram of your lpc2220. the fwflash and lpcload tool communicate via uart, exchanging commands and data. the fwflash tool is responsible for accessing the flash. the bootloader unfortunately can't handle the flash.
simply type make (you need to have the arm-elf toolchain in your path)!
here is an example:
 hackbard@staubsauger:~/projects/arm/betty$ sudo ./lpcload -d /dev/ttyS0 -f fwflash.hex -D0 flash0.bin -D2 flash2.bin -Db bootloader.bin
 boot loader init ...
 write firmware to ram ...
 unlock go command ...
 go ...
 flushing lpc tx buffer: 30 f9
 dumping content (addr=0x80000000, len=0x00100000) ...
  sending cmd: 52 80 00 00 00 00 10 00 00
  receiving data ...
 dumping content (addr=0x82000000, len=0x00100000) ...
  sending cmd: 52 82 00 00 00 00 10 00 00
  receiving data ...
 dumping content (addr=0x7fffe000, len=0x00002000) ...
  sending cmd: 52 7f ff e0 00 00 00 20 00
  receiving data ...
 hackbard@staubsauger:~/projects/arm/betty$ sudo chmod 644 flash0.bin flash2.bin bootloader.bin
this will take about 3 minutes and 10 secs. after that you will have the contents of flash 0, 2 and the bootloader in the files flash0.bin, flash1.bin and bootloader.bin. have fun with hexdump! :)
and another example:
 hackbard@staubsauger:~/projects/arm/betty$ sudo ./lpcload -d /dev/ttyS0 -f fwflash.hex -w betty.hex
 boot loader init ...
 write firmware to ram ...
 unlock go command ...
 go ...
 flushing lpc tx buffer: 30 f7
 writing firmware to flash ...
this will write the firmware located in betty.hex into the flash. the betty.c code can also be found at the above location. if you compile your own code, make sure to use the flash at bank0 only or adjust the lpcload/fwflash code (should be simple).
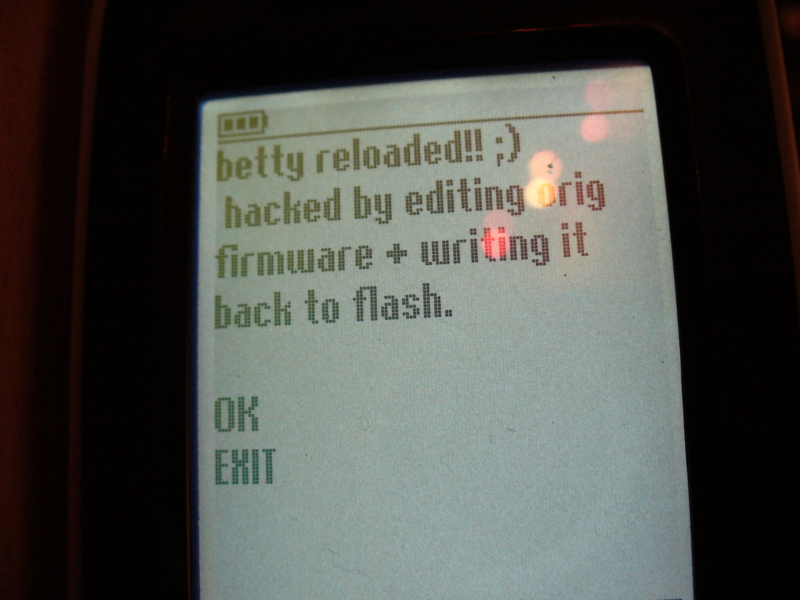
this way you could modify the original firmware and write it back to flash (using -b switch for a binary file in addition to -w).
actually the tool works now. it's dirty code. it might get enhanced concerning features, e.g. flashing bank2, speed etc ... i just don't care!
first of all, lots of hardware reversing is necessary. hopefully there will be a few updates to the circuit chapter above.
follow the firmware development here: http://www.hackdaworld.org/cgi-bin/gitweb.cgi?p=my-code/arm.git;a=tree;f=betty
the main file is betty.c, in the makefile you can see which files betty depends on.
this is fun. the first time i am trying to understand how a filesystem could be implemented. pffs (pseudo flash filesystem) will be my dirty, slow, stupid and tons of unnecessary storage consuming filesystem of the new betty firmware.
using bmp2b.c, you can convert 24 bit rgb bitmap files (and only these!) to a binary or an ascii include file containing the data in a char array which can be directly loaded to the ram of the betty lcd. it also creates an additional file only using 4 colors (should give you a feeling about the look on your betty!).
if you want to understand the way data has to be written to the lcd ram you most probably want to have a look at this tool and/or page 21 of the lcd datasheet.
build:
fetch the bmp api first (located at my-code/api). put it in the appropriate directory or change the makefile. after that issue:
make bmp2b
usage:
$ ./bmp2b -i my_logo.bmp -o my_logo.h -c
use -b switch to create a binary file ready for the flash. the file blook_my_logo.bmp aims to reproduce the look of the logo on the betty display.
the default_logo.h (included in the git repository) was created by this tool and should look like this on the betty display:
![]()
and actually - as you can see - this fit is quite okay:
font2b converts 8x8 linux console fonts to lcd ram format similar to the bmp2b tool. default_font.h included in the git repository was converted from font_pearl_8x8.c taken from linux source. this font was used in early versions of linux-m68k.
usage:
to get a header file containing a char array use:
$ ./font2b > default_font.h
or issue
$ ./font2b default_font.b
to get a binary file. you can see the result of the m68k font in the next picture.
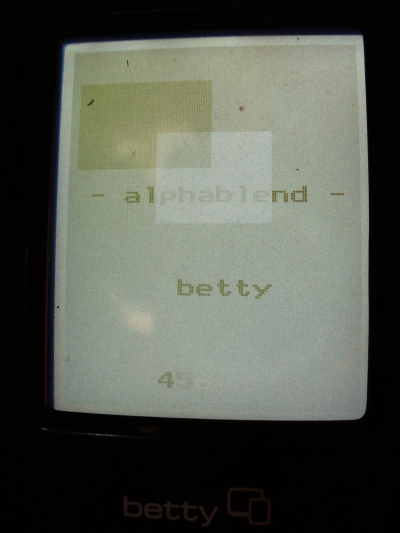
there is alphablending support now. since the usual math - c=alpha*a+(1-alpha)*b where c is the result for a over b - doesn't make too much sense for a 4 grayscale mode display, the code needs to be reconsidered. :)
you must not forget to enable irq and fiq during startup (cpsr_c)! concerning vic: the pc relative ldr (#-0xff0) in the very beginning of startup.s loads the address from the vectored interrupt controller address register.
have a look at the resume loop in input_event(). if not used, interrupts are triggered immediately after resetting extint3 before even leaving the callback. this ends up in a too big stack making the application crash!
to be continued ...
to be continued ...